Install PennyOS
From a blank microSD card to the PennyOS Home screen. About an hour, most of it spent waiting for the drivers to build.
What you need
- A Beepy with a Raspberry Pi Zero 2 W. The original Zero W has one core and is not enough for the drawn shell.
- A microSD card of 16 GB or more, and a computer that can write it.
- Wi-Fi the Beepy can join. The Pi's radio is 2.4 GHz only.
- The PennyOS source. It is shared by request: ask for access with the Contact me button on this page.
- Optional: a server for Ask, Chat, Mail, Search, Glance, Usage and sync. See Working with Obsidian. You can add it later.
1. Write Raspberry Pi OS Lite to the card
Use Raspberry Pi Imager and pick Raspberry Pi OS Lite, Bookworm, 64-bit. It has no desktop, which is what you want. In Imager's settings:
- set a username and password;
- enter your Wi-Fi network and country;
- enable SSH with public key authentication, and paste your computer's public key.
Put the card in the Beepy, slide the power switch on, and give it a few minutes. The screen stays blank or shows boot text: the display driver is not installed yet.
2. Copy the source to the Beepy
Raspberry Pi OS Lite does not include git, so clone on your computer and copy the tree across. Replace you and beepy.local with your username and the device's hostname.
On your computer
git clone git@github.com:miaowoof/pennyos.git
rsync -a --exclude .git pennyos/ you@beepy.local:~/pennyos/
3. Run the installer
On the Beepy, over SSH
cd ~/pennyos
sudo ./install.sh
sudo reboot
The installer is safe to run again. In order, it:
- makes a swapfile big enough to compile kernel modules;
- adds the Beepy package repository and builds the
sharp-drmdisplay andbeepy-kbdkeyboard drivers, falling back to the patched copies indrivers/when the packaged ones do not build on the current kernel; - holds the kernel and driver packages with
apt-mark hold, so a routine upgrade cannot break the display; - copies PennyOS to
/opt/pennyosand writes/etc/pennyos.conffrom the example if it does not exist; - installs
pennyos.serviceon tty2, and gives tty1 an automatic login into tmux, so the terminal is always one key away; - tunes the touchpad, opens the few sysfs files the shell writes, allows Wi-Fi scans from Settings, and locks down SSH to keys only;
- turns off hardware nothing uses: Bluetooth, HDMI, audio, the board LED and ModemManager;
- sets
maxcpus=2for the Zero 2 W and prints the device's SSH public key for your server.
Building the drivers takes a long time on a Pi Zero. Let it finish. After the reboot you should see the PennyOS splash, then Home.
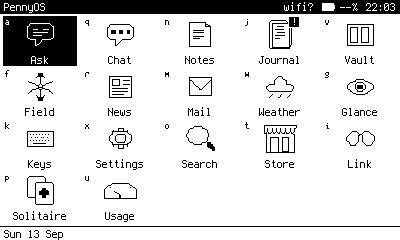
Home after a fresh install. Nothing is waiting yet, so the only badge is Journal's reminder that today has no entry.
Flashing from another computer instead
If you set up several cards, tools/flash-sd.sh writes the OS image and drops a first boot script onto the card that installs the drivers and PennyOS unattended. It is written for macOS and needs the image in images/ and a wifi.txt with your network name on the first line and passphrase on the second.
On a Mac
sudo tools/flash-sd.sh /dev/diskNThe first boot sets the user and Wi-Fi, the second builds the drivers and installs PennyOS, and the third boots into the shell. diskN must be the card: check with diskutil list, because the script erases what you name.
Updating
Copy the new tree over the old one and rerun the installer without rebuilding the drivers:
On your computer
rsync -a --exclude .git pennyos/ you@beepy.local:~/pennyos/
ssh you@beepy.local 'cd ~/pennyos && sudo ./install.sh --no-drivers && sudo systemctl restart pennyos.service'
tools/deploy.sh does the same in one command and can pull a picture of the live panel back with --shot panel.png. Set PENNYOS_HOST and PENNYOS_KEY to your device and key first.
Two things to know
Do not pass
--deleteto the device copy: a file likewifi.txtmay live only there. And files removed from the source are not yet removed from/opt/pennyos, so an old module can linger. It is harmless, since nothing imports it.A green
systemctl is-activeonly means the service started. Look at the panel to know the update landed; Settings > About shows the version.
Next
Go to First boot to set Wi-Fi, a location and a PIN.